
Alpha Particle Spark Detector Kit
To demonstrate the detection of alpha particles.
Components
 |
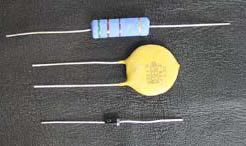 |
Alpha Particle Spark Detector Components
| Item Code & Price | Description |
|---|---|
| HVPS-07 - $74.95 | Adjustable Negative High Voltage Power Supply |
| TW-003 - $4.00 | .003 Tungsten Wire (36") |
| DI-6K - $1.00 | Standard HV Diode 6KV |
| CAP-2200pf-3.3KV - $1.00 | 2000pf 3.3KV capacitor |
| RES-510-5W - $1.00 | 510 Ohm Resistor 5 Watt |
How to build your own Alpha Particle Spark Detector
Purchase a finished assemble instrument here
Introduction:
I was introduced to alpha particle spark detectors when I watched a YouTube video [1] by Carl Willis of his homemade spark detector. I like the detector so much that I wanted to build one for myself. So, I researched the topic and read the seminal work from 1944 by W.Y. Chang and S. Rosenblum [2].
Overview:
The device is pretty simple. Take thin tungsten wire and charge it to about 3000 volts with respect to the ground. Position the wire approximately 1/16" (1.5 mm) above a smooth brass ground plate. The air acts like an insulator between the highly charged wire and ground plate.
When an alpha particle passes in between the wire and the electrode it ionizes the air between. The high voltage potential between the wires and the electrode is triggered by the ionization of the alpha particle, which causes an electrical avalanche that we see as an electrical discharge (spark) between the wires and the electrode.
This detector is only sensitive to alpha (α) particles and will not detect beta (β), X-ray, or gamma (γ) radiation.
Our device operates on this same principle, but there are a few changes. First, I am using thinner copper wires (.003 diameter) held at ground potential. It is a metal plate that is charged to approximately 8000 volts. The wire is positioned approximately 0.1" (3mm) away from the metal plate.
Caution: This device uses a high-voltage power supply and radioactive materials. Please follow the proper precautions.
The following is the parts list:
- (4) 3 KV capacitors Allied PN# 70016091
- (2) 6KV diodes Images PN# DI-6KV
- (1) 510 ohm 5W Allied PN# 70204781
- (1) Prototyping pcb Allied PN# 70219395
- (1) Adj HV power supply Images PN# HVT-07
- (1) Metal plate (see text)
- (1) .003 copper wire Images PN# CW.003
- Misc. 1/8" plastic, 22 ga. wire, copper foil tape.
Schematic and Board Cutout
Build Instructions:
The following is a schematic of the alpha particle spark detector. Schematic Drawing
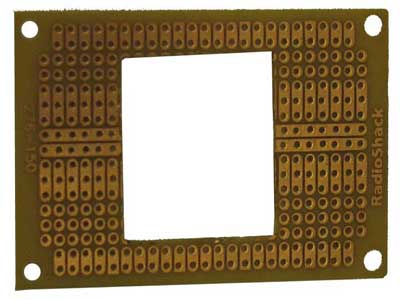
We begin by creating the holder for the .003-diameter copper wire. We start with a basic prototyping board, shown below.
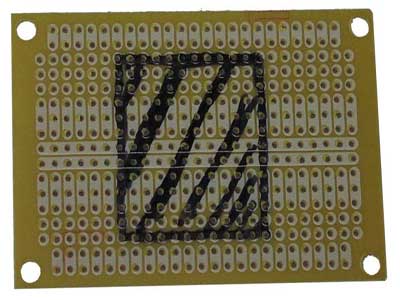
We mark the top side of the board with a rectangle.
Cut out the rectangle.
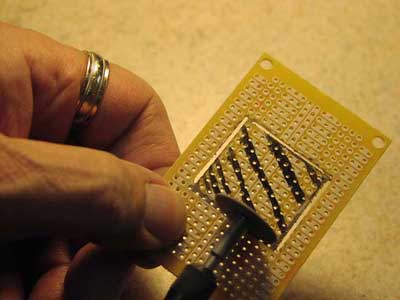
Building The PC Board Detector
Build Instructions continued.
After the board is cut, I soldered five .003 copper wires across the opening, approximately equally spaced. On one side, I soldered a 22-gauge insulated wire that would connect the assembly to ground.
 https://www.imagesco.com/articles/geiger/alpha_particle_spark_detector_images/steel-plate.jpg
Next, I obtained a 1/8" thick x 1" x 3/5" metal plate. To this, I attached copper foil tape to make an electrical connection. Just about any metal can be used for this plate. You can also use copper-clad PC board. The main criteria for the plate is that it doesn't flex or bend.
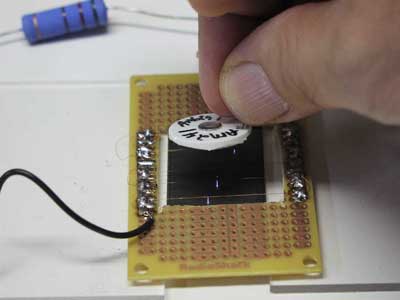
Testing The PC Board Detector
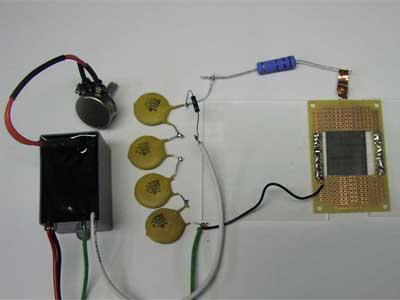
You can purchase an off-the-shelf adjustable high-voltage power supply suitable for this project. Using the power supply, we wire up our components as detailed in the schematic. A photo of the setup is shown below.
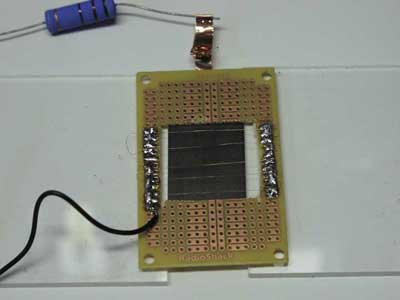
The metal plate has two 1/8" plastic squares next to it. The prototyping board rests on the plastic squares as shown. The wires are positioned approximately 0.1" above the metal plate.
Next, bring an alpha particle source close to the detector. You will see an electrical discharge between the wires and HV plate. Power is applied to the detector. There should not be any electrical discharge until an alpha particle is brought near the detector. If your detector immediately begins to arc (have a discharge between the wires and plate), use the potentiometer on the adjustable power supply to reduce power. If that doesn't work, you must increase the space between the wires and the plate. Also, note that the .003 copper wires should be soldered taut across the opening so that they do not droop down close to the plate.
PC Board Detector Bibliography & Supplier list:
Parts Suppliers:
- Allied Electronics
- alliedelec.com
- 866-433-5722
- (local distributor)
- Images Scientific Instruments
- imagesco.com
- 718-966-3694
Bibliography:
- Carl Willis YouTube video
- "A simple Counting System for Alpha-Ray Spectra and the Energy Distribution of Po Alpha Particles" W.Y. Chang and S. Rosenblum, Dec. 29, 1944
- "Characteristics of an alpha particle corona-streamer counter in air." A.J. Tavendale, June 13, 1962
- "Counting Particles from Space." Shawn Carlson Scientific American Feb, 2001
- "Spark Chamber Project: Step by Step procedure." Andree Robichaud-Veronneau
