 uilding a Thermoelectric Generator:
To operate the generator we need to heat one side of the TEG while simultaneously cooling the opposite side. This is achieved by securing two aluminum leg extrusions, spring clamped to the each side of the TEG module. The aluminum legs transfers heat and cold from the water baths to the TEG module. One aluminum leg extends down into a hot water bath and the other extends into a cold-water bath see figure 2.

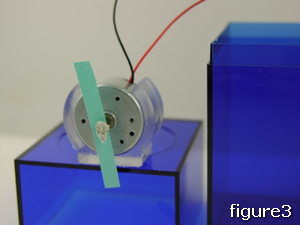
After about a minute from the legs being submerged into the water baths the TEG generates sufficient electric power to spin a homemade paper propeller on a high efficiency low power electric motor, see figure 3.
Not all small electric motors will work. You need a motor that requires only a small amount of power to function. You can try cassette motor if you have one available. Otherwise pick up the motor in the parts list.

The aluminum legs are each made up of two smaller 1/8” thick aluminum plates, see figure 4. Two machine screws 4-40 x 3/8”and nuts hold the plates making up a leg together.
The components for the Thermo-electric generator are shown in figure 5.
Once the legs are assembled they can be secured to the TEG using a large spring paper clip, see photograph. The electrical leads from the TEG are soldered to a high efficiency low power motor. Two water canisters are needed for the hot and cold water baths. The rectangle shape of the containers allow the containers to be positioned next to one another. This allows the legs, which only have about ½” space between them to slide into the hot and cold water baths.

Fill the cold water bath with cold water and ice cubes. Fill the hot container with boiling hot water. Place the legs of the thermo-electric generator in the water baths.
Aside from powering an electric motor you can also use a multimeter to measure voltage and current output of your TEG module.

